 Eclipse Jubula is a pretty new addition to the Eclipse universe. It’s a functional UI testing tool that allows you to specify and run tests. The tests are not code-based but can be assembled from available building blocks or recorded in the UI.
While evaluating tools for doing functional tests for an Eclipse Plugin, I wanted to check out how easy it would be to integrate it into our Continuous Integration builds with Jenkins (the CI server formerly known as Hudson). It turned out there were a few pitfalls, but in the end it was pretty straightforward – hopefully this article will save you some time.
To get started, download and install Jubula from the download page. After installation (simply run setup.sh, and install it for example into /home/jenkins/jubula), you’ll have to prepare your target RCP or Eclipse Runtime by extracting rcp-support.zip from the Jubula installation to the RCP Application/Eclipse directory. This contains a plugin that needs to be available in the AUT (Application Under Test) for Jubula to be able to run the tests.
Pitfall: The provided Jubula installation package for Linux includes a 32-bit JRE and SWT in a 32-bit version that is used to run Jubula and its tools. The CI server being a 64-bit machine I had to install quite a few 32-bit shared libraries to get Jubula to run. To find out what libraries are missing, starting Jubula locally on the CI server with the -debug -console -consoleLog options helped. On the CI build server you might get away without this step if all you run locally is the autagent (see below).
Specifying a Test
Jubula comes with quite a good User Manual. For an introduction on how to create your first Jubula test, I’d recommend the excellent series of posts by Joachim.
This post assumes that you have a test project name MyTest with a test suite named AboutDialogTest and AUT configuration named Eclipse_Helios.
Pitfall: Make sure your test specifies either German (Germany) or English (United States) as the keyboard layout (see here). These are the only two keyboard layouts provided out-of-the-box by Jubula at the moment.
Test Executor
Running Jubula from the command line is done using the Test Executor (testexec). It’s command line options are documented here.
If, for example, you’re testing an Eclipse Plugin, your testexec command line would look something like this:
$JUBULA_HOME/jubula/testexec -project MyTest -version 1.0 -testsuite AboutDialogTest
-server localhost -port 60000 -autconfig Eclipse_Helios
-datadir $WORKSPACE/testdata -resultdir $WORKSPACE/testresults
-data /home/jenkins/.jubula/workspace
-language en_US -dbscheme "Default Embedded (H2)"
-dbuser sa -dbpw ""
This is using the default embedded database scheme. In a production environment, you’ll typically use a real database that is available to both testers specifying tests and the build server. Available DB schemes are configured in Jubula under Window/Preferences/Test/Database Connections. The -data parameter points to the workspace directory where the database configuration is stored. So you’ll have to either edit this locally on the server, or copy the workspace over to the server to somewhere Jenkins can see it.
The test executor can be configured to either
- Start a new AUT instance as shown above with the -autconfig parameter
- Connect to a running AUT instance that has been started using the -autid parameter
You can also pass all these options via a configuration file instead of command line parameters should you prefer.
AUT Agent
Before running the Test Executor, you’ll have to start the AUT Agent (Jubula daemon providing the bridge between the test executor and the Application Under Test) first.
The AUT agent can be started with
$JUBULA_HOME/server/autagent -p 60000 -v
- -p: Port
- -v: Verbose mode
As this this an UI test, the agent is started under X11. I haven’t yet explored the possibilities of running the AUT without having an active X11 session. Our CI server has an active X11 session all the time for driving an Extreme Feedback Panel anyways.
Pitfall: The AUT agent seems to accept only a single connection at a time, the test executor can’t connect to it while Jubula is still connected to the same AUT Agent.
Configuring Jenkins
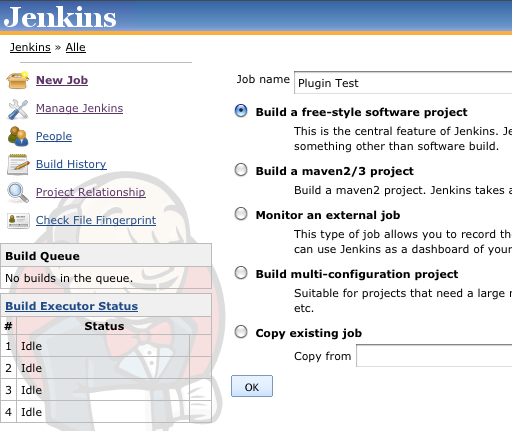
1.) Create a new Job

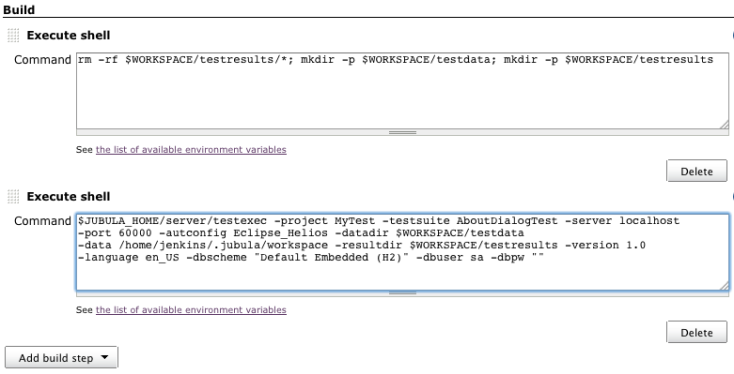
2.) Add a step for creating necessary directories, and a step to run testexec

Note: The shell commands are just provided as an example. In a real job you would most probably replace this with something like an Ant script to prepare the environment, auto-deploy your plugin or the whole RCP application, run the the tests and then check the return code from testexec. Edit: This has been documented here
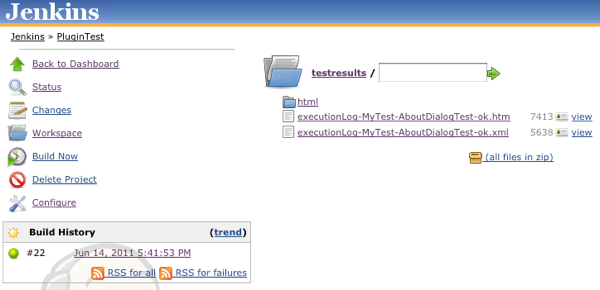
3.) Run the job
![]()
4.) Check out the results

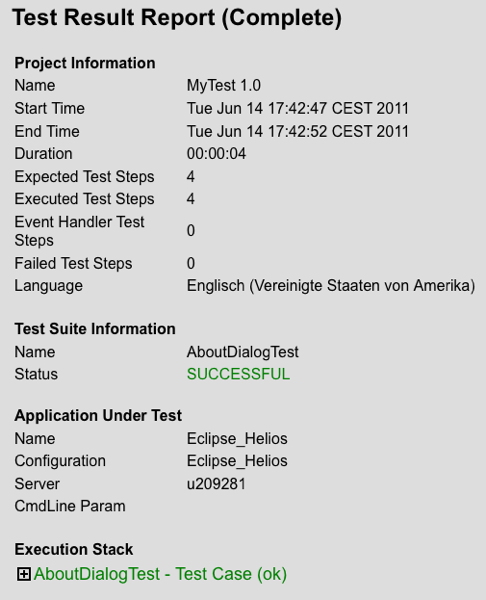
The generated HTML report will look something like this:

Possible Job Improvements
- Auto-deploy plugin and/or RCP runtime
- Connect to a real database instead of the embedded Jubula instance
- This is simply a matter of configuring a new database in the workspace pointed to by the
-dataparameter (see above), and setting the-dbschemeparameter to the name of the DB configuration. - Show screenshots taken by Jubula upon test failures directly in the test report
- This is currently only possible inside Jubula’s test result perspective. Would be nice to have the screenshot embedded into the HTML reports.

Great post, thanks. And it nicely complements the tutorial on my blog.
Also, as an idea, you could even publish (and potentially archive) the Jubula test report on Jenkins via the “HTML Publisher Plugin”.
Thanks for the tip, that plugin looks interesting
Just to address the improvements:
Auto-deploy: This is a topic we’ve been pondering for years. We just can’t find a solution which covers every aspect. Maybe it’s time to settle for the 90% solution.
DB: This is mostly a matter of setting up a DB and adding the parameters to the workspace settings. Let us know if the documentation is unclear on this. For users of the Eclipse for Testers package or the Jubula feature: we’ll make a fragment with the DB drivers available on Eclipse Marketplace during this week.
Screenshots: Actually making screenshots on errors is the default behaviour. If an error occurs a screenshot is taken and stored in the database. For the time being you have to use the Jubula client to view the results (including the screen shots9.
– Achim
Hi Matt, excellent post, thanks! Screenshots are automatically created on errors, and are saved into the database. You can reopen the test result from the reporting perspective to see the screenshot for each failed step directly in the ITE. If the project is open, then you can look at the specification of the failed module in the project itself. The HTML reports can’t be configured to use the screenshots. Hope that helps!
Alex Imrie
Thank you for that post, I found some good answers here!
But there’s still a question I have. I’m not sure how I should build my RCP Application with Jenkins to make it ready for a Jubula test. My Application should not include those Jubula Plug-Ins at the end, only for testing. So, do you have an idea how I could prepare my Application for Jubula? Is it just as easy as copying it to the plugins directory and removing it afterwards?
Additionally, I thought it is necessary to edit the config.ini, but I read your example to do all with ANT and I can’t find anything about that in your code.
Greets,
David
Your application does not need to include the plugin, you can simply extract the Jubula plugin into the plugin directory before starting the application for a test run. I was doing this for an Eclipse plugin tested in Eclipse, but I guess with an RCP application it would work more or less the same. In the Ant file example, this is done using
No, it doesn’t work if I only extract the Jubula plugin and add it to the plugin directory of my RCP application. I need to edit the configuration/config.ini and your Ant example doesn’t do that.
And I thought this example here describes how to build an RCP application, not just a plugin? The Jubula Help “4.2.2 Setting up an RCP AUT for testing” describes in point three that this configuration/config.ini has to be edited if “org.eclipse.update.configurator@3:start” is not defined. And I’m not sure how to manage that this is the case.
Hi Matt, thank you very much for your example. I just want to do the same thing as you did but on a Windows system. I have tried as you said, but it doesn’t work. Do you have an idea about how to do it in Windows? Can you tell me the steps needed?
Hi,
sorry, never tried that. I don’t think there should be much of a difference.
Thank you for your response. I have followed the steps in your example
I created a new job and added three script shells:
(1) rm -rf $WORKSPACE/testresults/*; mkdir -p $WORKSPACE/testdata; mkdir -p $WORKSPACE/testresults
(2) D:/jubula/server/autagent -p 60000 -v
(3) D:/jubula/jubula/testexec -project My Third Project -testsuite test2 -server localhost -port 60000 -autconfig Eclipse3 datadir $WORKSPACE/testdata -data /home/jenkins/.jubula/workspace -resultdir $WORKSPACE/testresults -version 1.0 -language en_US -dbscheme “Default Embedded (H2)” -dbuser sa -dbpw “”
But I lance the job and there is a mistake:
Building in workspace D:\Utilisateurs\A534346\.jenkins\jobs\Plugin Test\workspace
[workspace] $ sh -xe C:\Windows\TEMP\hudson9006745285536089314.sh
The system cannot find the file specified
FATAL: L’exécution de la commande a échoué.
java.io.IOException: Cannot run program “sh” (in directory “D:\Utilisateurs\A534346\.jenkins\jobs\Plugin Test\workspace”): CreateProcess error=2, Le fichier spécifié est introuvable
I have installed Jubula in the disk D and my system is Windows 7. For “/home/jenkins/.jubula/workspace”, I don’t know how to change this configuration. And for the mistake of the test, is it because I just missed some steps?
Hi all and thank you for this post.
Actually this is not a full integration with Jenkins. It is just firing some command line. Focus on app is necessary and it cannot be processed in foreground like a mvn process. And which is more awkward, app start minimized so you don’t have focus on it and test fails
Hi,
it’s been a while since I’ve tried this so it might require a bit of work to get it to work correctly in newer versions of Jubula. There’s also a post with an example Ant file to further automate tests.
You don’t have to run the UI locally on the build server, the autagent could run for example on a dedicated Jubula test host. Not sure about your minimizing problems, I mever experienced that.
when Jenkins launches my app on win 7, I can see my app in toolbar but it opens minized. Then jubula perfoms click here and there hiting whatever is in front or focus. What I understand is jubula performs real click, real events agains real application in the way you lost control of your pc and you can’t have any other application window on top of your AUT. Therefore is not like other jenkins jobs integrated with maven that happens in background, is like a robot using your app.
Anyway this is a cool app though 🙂
Hi,
If your application isn’t in the foreground / is minimized, then you could have a look at this Jubula forum thread:
http://www.eclipse.org/forums/index.php/t/238562/
It covers how to get the right AUT to the front. Could it also be possible that the AUT starting minimized is configurable on your system / for your AUT?
Hope that’s helpful!